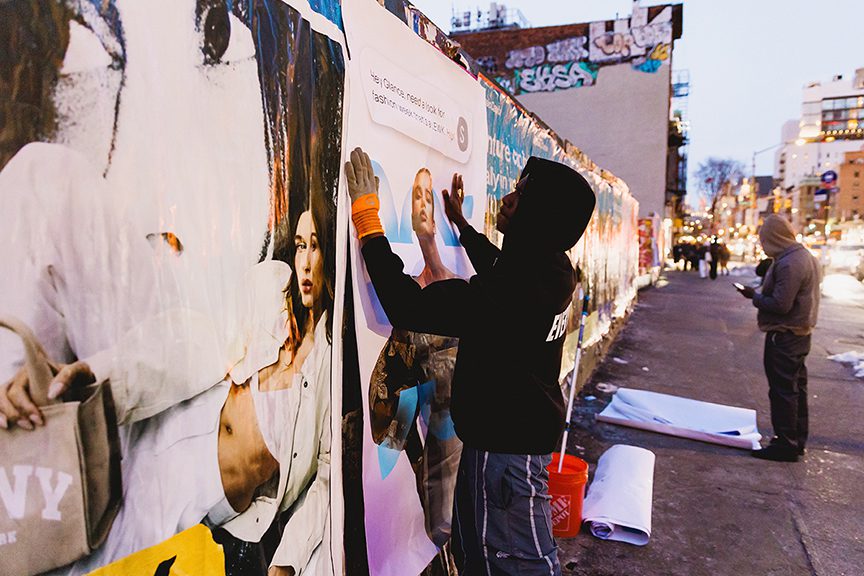
From paste recipe to final placement, this is how professional wheatpaste campaigns actually get executed in New York, Los Angeles, and every other market we work.
Wheatpasting looks simple from the sidewalk. Someone put a poster on a wall. But behind the flat, clean surface of a well-executed paste-up is a process with real variables: paste consistency, surface chemistry, weather conditions, paper weight, application sequence, drying time, and edge technique. Get those variables right and your poster bonds to a wall for weeks. Get them wrong and the edges peel in 24 hours and the face tears when it rains.
At American Guerrilla Marketing, we have run wheatpaste campaigns in New York City, Los Angeles, Chicago, Miami, Austin, and other markets for over a decade. We have executed campaigns in January cold and August heat. We have pasted on brick, on plywood, on painted metal, and on old poster layers six sheets deep. We know what works and what fails, and we are laying all of it out here so you understand the process before you start planning a campaign.
This guide covers every stage of the process. Read it in full before you buy paper, mix paste, or call anyone about a campaign. The decisions you make in planning determine more about your outcome than anything you do on install day.
Wheatpaste is an adhesive made by cooking wheat starch or all-purpose flour with water until the mixture thickens and becomes sticky. The name is straightforward: paste made from wheat. It has been used as an adhesive for paper for centuries, long before commercial outdoor advertising existed. Bookbinders used it. Papier-mache artists used it. And street poster installers have used it in urban environments for as long as cities have had walls worth covering.
What makes wheatpaste effective for outdoor advertising comes down to a few physical properties. First, the paste soaks into porous surfaces like brick, concrete, and unsealed wood, creating a mechanical bond rather than just a surface-level stick. Second, because the adhesive saturates the paper from both sides during proper application, the paste essentially laminate the poster to the surface. Third, wheatpaste dries to a hard, weather-resistant film that holds the paper flat against the surface rather than allowing it to flex and peel.
The result, when done correctly, is a poster that lies completely flat against the wall with no bubbles, no curled edges, and no visible seams. It looks like it was always part of that surface. That visual quality, the way a properly pasted poster seems to belong to the wall, is part of what makes wheatpaste advertising feel more credible and culturally embedded than tape-mounted or stapled posters.
Wheatpaste is also water-soluble when wet, which means it is not chemically aggressive to surfaces and can be removed with water and scraping if needed. Once fully cured, the bond is strong but not permanent. Old layers weather over time and new layers go on top. The street poster environment in any active city is a constantly evolving palimpsest of campaigns layered over campaigns, with the most recent claiming the surface temporarily.
The Paste Recipe: Standard and Professional Variants
The basic wheatpaste recipe has not changed much in a century. The variables are the ingredient ratios and any additives chosen for specific performance requirements. Here is how we approach paste production for campaigns of different scales and weather conditions.
Basic Recipe: Small Batch (for 25 to 50 posters)
For a small campaign or a test run, this batch produces enough paste for 25 to 50 standard 18×24 or 24×36 posters with base coat and top coat applied.
1 cup wheat starch (preferred) or all-purpose flour
4 cups cold water
Optional: 1 tablespoon white granulated sugar (extends working time slightly)
Optional: 1/4 cup PVA glue added after cooling (improves weather resistance)
Dissolve the starch or flour in one cup of the cold water first, stirring until completely smooth with no lumps. Bring the remaining three cups of water to medium heat in a saucepan. Add the dissolved starch mixture while stirring. Continue stirring over medium heat until the mixture thickens and turns translucent. This takes 10 to 15 minutes. Remove from heat and allow to cool. The paste will continue to thicken as it cools. Thin with water as needed to reach the right consistency before using.
Professional Batch: Outdoor Campaign Formula (for 100 to 200 posters)
This is the formula we use for full-scale outdoor campaigns. It includes PVA for durability and is scaled for a five-gallon working bucket.
6 cups wheat starch
1.5 gallons cold water for the cook
1 to 1.5 gallons hot water added after cooking to reach working consistency
1 to 1.5 cups PVA glue added to the cooled paste and stirred in thoroughly
Cook the starch in the same way as the small batch, scaling up the quantities. Once cooked, allow to cool to room temperature. Then add PVA and mix thoroughly. The working consistency should be similar to a thick cream sauce: it coats a brush fully and pulls off in slow drips rather than running freely. If it is too thick, add water in small amounts. If it is too thin, cook an additional small batch at higher concentration and combine.
Weather Adjustments
Hot and sunny conditions cause paste to dry faster than usual. For summer installs in direct sun or high-heat environments, use slightly thicker paste to extend working time before it skins over. Adding a bit more PVA to the mix also helps in extreme heat conditions.
Cold conditions cause paste to thicken as it sits and slow curing on the wall. For cold-weather installs, use slightly thinner paste to maintain brush-ability as temperatures drop during an installation day. Adding a small amount of glycerin to the mix can help extend workability in near-freezing conditions.
Never install in rain or on wet surfaces. Paste on a wet surface will not cure properly. The bond fails and posters peel within hours. Check the forecast and schedule installations during dry windows of at least 12 to 18 hours following the install.
Choosing the Right Paper for Street Campaigns
Paper selection affects adhesion, print quality, durability, and installation handling. The wrong paper makes a campaign fail even if everything else is executed perfectly.
Paper Type
Weight Range
Adhesion
Durability
Best Use Case
Newsprint
30-50 lb
High (very porous)
Low
Short-term or budget campaigns
Uncoated text stock
60-70 lb
High
Medium
Standard outdoor campaigns, good balance
Uncoated cover stock
65-80 lb
High
Medium-High
Most professional street campaigns
Matte coated text
60-80 lb
Medium (less absorption)
Medium
Campaigns prioritizing print quality
Gloss coated
Any
Low (coating blocks paste)
Low for wheatpaste
Not recommended for wheatpaste
Poster paper / satin
70-100 lb
Medium-High
High
Premium formats, longer campaigns
Our standard recommendation for professional outdoor wheatpaste campaigns is 70 to 80 pound uncoated cover or text stock. This weight is sturdy enough to handle during installation without tearing, absorbent enough to form a strong paste bond, and produces sharp printing across the full color range. Lighter weights feel more fragile during installation and have less weather resistance. Heavier weights absorb paste slower and can bubble if not pressed thoroughly.
Avoid glossy or high-gloss coated stock entirely for wheatpaste applications. The coating prevents paste penetration, which means the bond forms only on the edges and back of the poster rather than saturating the paper. These posters begin lifting within days regardless of how well the application is executed.
Surface Assessment: What You Can and Cannot Paste On
Not every outdoor surface is a viable poster surface. Assessing surfaces before committing to a location is a core part of professional campaign planning. Here is how to think about surface suitability.
Surfaces That Accept Wheatpaste Well
Sealed or painted plywood construction barriers (the most consistent surface for outdoor poster campaigns)
Painted brick or concrete block walls where the paint layer is well-adhered
Painted or primed concrete walls with moderate porosity
Existing stable poster layers from previous campaigns
Painted steel roll-up doors and utility boxes
Unpainted concrete with moderate texture
Surfaces That Do Not Work
Surfaces with loose, flaking, or peeling paint (the bond is only as strong as the weakest layer)
Smooth polished concrete or glass (no mechanical adhesion point)
Actively wet or water-saturated surfaces
Surfaces with fresh paint less than 48 hours old
Surfaces with silicone-based coatings or sealants
Surfaces coated with heavy grease or oil contamination
When scouting locations, press a fingernail into any paint layer on candidate surfaces. Stable paint does not flake or chip under light pressure. Unstable paint reveals itself immediately. A surface that fails the fingernail test will fail the poster test. Move to the next candidate rather than wasting material on a compromised surface.
AGM Field Note: Old Poster Layers Are Often Your Best Surface
In heavily postered neighborhoods like Bushwick and the Lower East Side, walls that have been actively postered for years develop a thick paper-mache-like surface from accumulated layers. These layered surfaces accept wheatpaste extremely well because the top layer is already paper, which bonds readily to fresh paste. When scouting, we look for established poster surfaces as much as blank walls.
Equipment You Need for a Professional Wheatpaste Installation
The core tool list for professional wheatpaste installation is not complicated, but having the right tools for each specific task makes a real difference in output quality and installation speed.
5-gallon bucket with lid for paste transport and working reservoir during installation
4-inch and 6-inch foam rollers or paintbrushes for paste application to surfaces and poster faces
2-inch trim brush for corners, edges, and tight detail work
Water bucket or spray bottle for pre-wetting surfaces before paste application
Foam roller sleeve for pressing out air bubbles on large-format installations
Step ladder or fold-out step stool for placements above standing reach
Nitrile gloves because dried wheatpaste is difficult to remove from hands and stains clothing
Plastic drop cloth or tube for transporting rolled posters without damage during transit
Camera or phone for documenting each placement immediately after installation
Headlamp for early morning or evening installs when natural light is limited
Paper towels or clean rags for wiping excess paste from frames, pavement, and equipment
Two people working together significantly increases both installation quality and pace. One person typically manages paste application (base coat and top coat), the other handles positioning and pressing. For large-format pieces over 24×36, three people is the right crew size: one on each top corner and one managing the bottom and center press.
Step-by-Step: The Full Wheatpaste Installation Process
Here is the complete installation sequence used on every professional AGM campaign. Each step matters. Skipping steps produces predictable failures.
Step 1: Surface Check
Before opening the paste bucket, assess the target surface. Is the paint stable? Is the surface dry? Is there active moisture or frost? Are existing poster layers adhered well or actively peeling? If the surface fails any of these checks, move to the next candidate location. Do not try to make a bad surface work.
Step 2: Pre-Wet the Surface
Use a water spray bottle or a damp sponge to wet the wall surface in the area where the poster will go. Pre-wetting is especially important on porous brick or rough concrete. On these surfaces, dry wall material pulls moisture from the paste faster than the paste can bond, which causes the adhesive to cure before it has fully penetrated the paper. A slightly damp surface gives the paste additional working time and improves bond strength on the first coat.
On plywood construction barriers and smooth painted surfaces, pre-wetting is less critical but still good practice. A light mist takes five seconds and reduces the risk of paste skinning over during the base coat stage.
Step 3: Apply the Base Coat
Brush or roll a generous coat of paste onto the surface in the target area. Cover an area slightly larger than the poster dimensions on all four sides. The base coat creates the primary adhesion layer. It should be thick enough to remain wet while you position and press the poster, not so thick that it runs and drips. A coating that covers but does not pool is right.
Step 4: Position the Poster
Bring the poster to the wall in its rolled or folded form. Unroll or unfold it against the paste-coated surface, aligning the top edge first if working with a partner. Align carefully before pressing down. Once the paste-coated paper contacts the paste-coated wall, repositioning is very difficult and almost always causes tears along fold lines or the paper surface. Take an extra ten seconds to get positioning right before committing.
Step 5: Press from Center Outward
With the poster positioned, press it flat against the wall starting from the center and working outward toward each edge. Use the flat of your palm or a clean foam roller. The goal is to push trapped air out from behind the paper before the paste begins to dry. Work methodically: center, top half, bottom half, left edge, right edge, all four corners. On large-format pieces, this pressing step takes 30 to 60 seconds and is the single most important factor in preventing bubbles.
Step 6: Apply the Top Coat
This step is what separates proper wheatpaste installation from an amateur paste job. Brush a full coat of paste over the entire face of the posted paper. The paste soaks through the paper and bonds to the adhesive on the wall behind it. This through-saturation is what makes a well-executed paste-up feel permanently bonded to the surface rather than just stuck to it. The top coat also seals the paper surface against moisture, extends weather resistance, and gives the finished placement its characteristic slightly matte, flat appearance.
Use a foam roller for large areas and a brush for corners and edges. Cover every square inch of the poster face. Do not miss strips along the edge. These are the first areas to lift if the top coat is incomplete.
Step 7: Seal Edges and Corners
After the top coat, go back over all four edges and all four corners with the detail brush loaded with paste. Push the brush under any edge that shows the slightest tendency to lift. Work the corners with extra paste, pressing down firmly with a finger after the brush. Corners fail before anything else does. Addressing them deliberately during installation prevents the “peeling corner” failure that makes a campaign look neglected within a few days of install.
Step 8: Document the Placement
Photograph the placement immediately after installation while everything is still wet and the poster is looking its best. Take one photo from across the street to show context, and one closer photo showing the installation quality and poster readability. Move to the next location.
AGM Field Note: The Top Coat Is Where Campaigns Are Won or Lost
We have seen campaigns where the client or a less experienced team did the base coat and positioned the posters but skipped a thorough top coat, thinking the base coat was enough. The results are consistently bad: posters that bubble as they dry, edges that lift within 48 hours, and corners that peel back within a week. The top coat takes 45 extra seconds per placement. It is not optional.
Planning a Wheatpaste Campaign: The Strategic Layer
Single posters get noticed. Campaigns create impact. The difference between one well-placed poster and a coordinated 100-placement campaign is the difference between a single note and a chord. Here is how we approach campaign planning for our clients.
Define the Audience First, Then the Geography
Start with who you are trying to reach. Age range, lifestyle, neighborhood patterns, media consumption habits, and cultural reference points. Then work backward to the geography. Where does that person live, work, shop, eat, and commute? The neighborhoods that answer those questions are the right target zones for the campaign.
For a streetwear brand targeting 18-to-28 year olds with strong interest in music and art, the answer in New York City is Bushwick along Myrtle and Wyckoff Avenues, Williamsburg along Bedford and Berry, and the Lower East Side along Orchard and Ludlow. Those specific corridors are where that audience concentrates. A campaign in Midtown would miss that audience entirely regardless of how many posters went up.
Map Placement Density Strategically
Density creates effect. A campaign with 10 placements scattered across the entire island of Manhattan feels invisible. The same 10 placements concentrated on two blocks in one neighborhood creates visible saturation. The person who commutes through that neighborhood sees your poster multiple times from multiple angles. That frequency drives recall in a way that scattered placement cannot.
We plan campaigns in zones. A zone is a defined geographic cluster where the campaign achieves density. A medium-size campaign might have three to five zones across a city, each with 15 to 30 placements clustered tightly. The total placement count matters less than the zone density and zone selection.
Plan Your Format for the Surface Inventory
The neighborhoods you target determine what format sizes work. Neighborhoods with primarily plywood construction barriers support any format from 18×24 up to multi-panel murals. Neighborhoods with primarily painted brick walls work well for 18×24 and 24×36. Very rough surfaces or irregular walls work better with smaller formats that conform to surface irregularities more easily. Scout the surface inventory before finalizing your format selection.
Timing and Wave Structure
For campaigns tied to a launch, release, or event date, plan your installation to hit peak awareness timing. A product launch campaign might place the first wave 10 to 14 days before the launch date, then refresh the highest-impact placements immediately after launch. This two-wave approach builds anticipation and then reinforces the message at peak audience attention.
For ongoing awareness campaigns, a rolling refresh model works better: install a portion of the campaign, monitor condition over two to three weeks, replace weathered or covered placements, and add new locations to the rotation. This keeps the campaign fresh without requiring a full budget outlay at once.
Design for Street Scale, Not Screen Scale
The single most common mistake brands make with their first street campaign is designing the poster for a screen and assuming it translates to the street. It usually does not. At 24×36 inches on a wall 15 feet from the viewer, text that read clearly at 12-point on a monitor is illegible. A design with six elements that was balanced on screen becomes chaotic at street scale because the viewer has milliseconds, not seconds, to process it.
Good street poster design has one dominant element visible from 30 feet, one secondary element readable from 15 feet, and one detail element for people who stop to look. Everything else is noise. The best street campaigns we have run for clients have had the simplest creative executions: bold headline, strong image, clear brand mark, one URL or handle at the bottom.
Common Mistakes and How to Avoid Them
We have seen every failure mode in the book. Here are the ones we encounter most often and what causes them.
Installing in rain or on damp surfaces: Paste does not cure properly when the surface or ambient humidity is high. Install only during dry weather windows and check the 24-hour forecast before committing to an install day.
Using too little paste on the base coat: A thin base coat skins over before the poster is positioned, which means the paper is bonding to a dried paste film rather than wet adhesive. Apply the base coat generously and work quickly to position before it dries.
Skipping the top coat: Already covered, but worth repeating because it is the most common quality failure we see in campaigns that were not run by professionals.
Using glossy coated paper: The paste cannot penetrate the coating. The poster will peel.
Installing in direct midday sun in summer: Heat and direct sun evaporate moisture from the paste and paper faster than you can apply it. Paste skins over before bonding. Move installs to early morning or evening in summer months.
Ignoring corners: Corners peel first. Every time. Address them deliberately during every single installation.
Not scouting before buying paper: Ordering a print run for a specific format and then discovering the target neighborhood does not have surfaces that fit that format wastes the entire print run. Scout first, then determine format, then print.
Measuring a Wheatpaste Campaign’s Impact
Street campaigns produce results across multiple measurement channels. No single measurement captures the full impact, which is why we recommend tracking at least two or three simultaneously.
QR code scans: Every campaign should include a QR code linking to a campaign-specific URL. Scan volume is direct engagement data from people who stopped in front of the poster and pulled out their phone. For clients who have not used QR codes on street campaigns before, the scan numbers are consistently higher than expectations.
Branded search lift: Street campaigns drive measurable increases in branded search queries in the neighborhoods where the campaign runs. This is visible in Google Search Console with geographic segmentation. The spike typically appears within three to five days of installation and continues for two to four weeks.
Direct traffic: Campaigns that include a URL in the poster design drive direct navigation. Monitor direct traffic from the install date and compare to pre-campaign baseline for the same time window.
Social posts and tags: People photograph good street campaigns and share them. Set up brand monitoring for your campaign hashtag, your brand handle, and the install neighborhoods. Track organic social mentions from the install date forward. Strong creative in the right neighborhood generates meaningful organic reach beyond the physical placements.
Campaign reports with placement photos: Our standard deliverable is photo documentation from every placement. These photos serve as the record of where the campaign ran and what it looked like, and they also function as content for brand social channels and PR use.
When to Hire a Professional Wheatpaste Company
DIY wheatpasting is viable for a personal project, a small community event, or a test run of five to ten placements in your home neighborhood. For a real marketing campaign, the calculus changes quickly. Here is why professional help produces better outcomes from the first campaign dollar.
Professional wheatpaste companies know which surfaces are available in which neighborhoods without requiring weeks of scout walks. They have crew infrastructure capable of completing 100 placements in a single market in one or two installation days. They have established relationships with print vendors who understand the paper specifications required for outdoor wheatpaste. And they have documentation standards that produce usable campaign reports rather than a folder of random phone photos.
The hidden cost of DIY campaigns is not the paste or the paper. It is the time spent scouting unfamiliar neighborhoods, the failed placements from wrong paper or wrong surface choices, the missed installs from weather that a more experienced team would have navigated around, and the documentation that does not meet the standard your decision-makers expect. Professional execution produces better outcomes per dollar for any campaign over 25 placements in a market where your team does not have ground-level expertise.
We have run campaigns ranging from 25 placements in a single Brooklyn neighborhood to 400-placement multi-city rollouts. The process we use is the same at both scales: scout, plan, prep, install, document, report. Whether your brief is small or large, the discipline of that process is what produces results you can actually show.
Frequently Asked Questions
What is the simplest wheatpaste recipe that actually works outdoors?
One cup of wheat starch dissolved in one cup of cold water, then combined with three additional cups of water and cooked over medium heat until the mixture thickens and turns slightly translucent. After cooling, add a quarter cup of PVA glue and stir in thoroughly. This batch covers roughly 30 to 50 standard posters with base coat and top coat applied. For larger campaigns, scale quantities proportionally.
What is the best paper weight for wheatpaste street campaigns?
70 to 80 pound uncoated text or cover stock is the standard recommendation for outdoor wheatpaste campaigns. This weight handles well during installation, absorbs paste thoroughly for a strong bond, and holds up to moderate weather exposure. Avoid glossy or coated stocks, which do not accept paste penetration and peel quickly.
How long does wheatpaste take to fully cure?
Wheatpaste typically reaches a working cure within one to two hours of application in normal dry conditions. Full hardness develops over 12 to 24 hours as the paste loses all residual moisture. During the first two to four hours, avoid touching or adjusting placements. If rain occurs within the first 12 hours, some edge lifting is likely because the paste has not fully cured to its maximum water resistance.
Can you wheatpaste in cold weather?
Yes, with adjustments. Cold temperatures slow cure time significantly. Below 40 degrees Fahrenheit, paste sets much more slowly and requires longer to reach working strength. Use slightly thinner paste to maintain brush-ability as temperatures drop. Schedule installs for the warmest part of the day. Avoid installing when temperatures are below 28 degrees Fahrenheit because the paste may freeze before curing. Adding a small amount of glycerin to the paste mix helps maintain workability in near-freezing conditions.
How do you prevent bubbles in a wheatpaste poster?
Bubbles form when air is trapped between the paper and the paste layer during application. The fix is thorough pressing immediately after positioning the poster. Press from the center outward to each edge systematically, pushing trapped air out before the paste skins over. On large formats, use a foam roller rather than a hand to maintain consistent pressure across the full surface. Apply the top coat while the poster is still wet to prevent contraction-related bubbling as the paper dries.
What poster sizes work best for street campaigns?
18×24 and 24×36 inches are the most practical sizes for wheatpaste street campaigns. Both are large enough to command attention from across the street and manageable enough for a two-person crew to install cleanly and quickly. Larger multi-sheet formats require more time per installation and work best for high-priority feature placements rather than volume coverage across many locations.
How many placements do you need for a campaign to be effective?
A meaningful campaign in a single neighborhood in New York City requires at minimum 30 to 50 placements to create the density necessary for repeated exposure. Citywide awareness in a major market typically requires 150 to 300 placements distributed across four to six target zones. The right number depends on the size of the target geography and how concentrated versus distributed the audience is. Concentrated campaigns with high zone density outperform scattered campaigns with high total placement counts.
Does the time of day affect wheatpaste installation quality?
Yes. Early morning and evening installs are generally best for quality outcomes. Morning installs benefit from cooler temperatures and lower humidity before the day heats up. Evening installs allow paste to cure overnight without heat-driven fast drying. Midday summer installs are the most challenging because direct sun and heat cause paste to dry much faster than usual, reducing working time and bond strength. In winter, midday installs are preferred because temperatures are at their daily maximum and paste remains workable longer.
How do you remove wheatpaste from a surface?
Wheatpaste is water-soluble before it cures and removable after curing with sustained water application. Soak the area with hot water and allow the moisture to penetrate the dried paste layer for several minutes. Then scrape with a plastic putty knife or stiff-bristle brush. A garden sprayer loaded with hot water makes the process much faster on large areas. Steam cleaners accelerate removal significantly on thick, multi-layer paste builds.
How does American Guerrilla Marketing document wheatpaste campaigns?
We photograph every placement on the day of installation, capturing each location from a context distance and close enough to confirm installation quality. Clients receive campaign reports with placement photos organized by location. For larger campaigns, we provide geo-tagged placement maps alongside the photo documentation. Campaign documentation is a standard deliverable on every project we run, not an optional add-on.