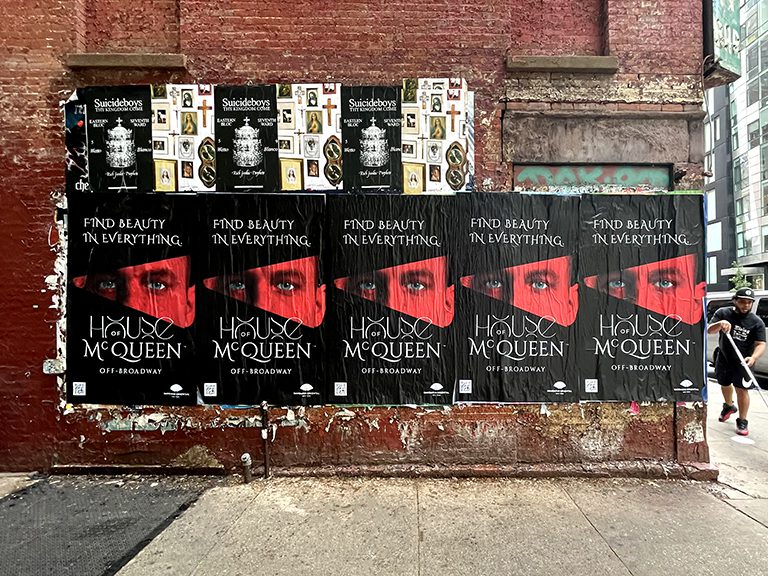
Ten years of street-level campaign execution distilled into the decisions that separate campaigns that land from campaigns that disappear into the wall.
Fly posting looks deceptively simple from the outside. Print a poster, paste it to a wall, people see it. The gap between that idea and a campaign that actually moves the needle is filled with decisions most people underestimate until they’ve already made the mistakes.
We’ve been running fly posting campaigns for over a decade. Our teams have worked the walls of Williamsburg, Bedford-Stuyvesant, and the Lower East Side in New York. We’ve covered Fairfax Avenue, the Arts District, and Melrose in Los Angeles. We’ve executed in Wicker Park and Pilsen in Chicago, Wynwood in Miami, and East Nashville. We know what works in each of those environments because we’ve tested it, failed on it, adjusted it, and tested it again.
What follows is the practical knowledge we apply to every campaign we run. It covers creative, location strategy, materials, execution timing, and documentation. If you’re planning a fly posting campaign or evaluating an agency’s proposal, this is the knowledge base you need to make informed decisions.
This is the single most important point on this entire list, and it’s the one most campaigns get wrong. Most fly posting creative that underperforms does so because it was designed for a digital environment and adapted for print as an afterthought.
The wall is a completely different design environment from a screen. On a screen, subtle gradients read clearly. Fine detail holds. Low-contrast designs work because the viewer is close, the display emits its own light, and the visual environment is controlled. On a wall, none of that applies. Light is variable across the day. Distance is real. The surface is textured and imperfect. Competing visual information surrounds the poster on all sides.
Effective fly posting creative uses high contrast between background and foreground. It uses large, bold type that reads from across a street. It uses images that communicate immediately at 10 feet away, not just at arm’s length. It uses a color palette that performs in bright midday sun and under streetlights at night. And it does all of this while still looking intentional and designed, not crude.
The Single Entry Point Rule
Your poster needs one visual entry point. One thing that captures attention first. One element that tells the viewer what the poster is about within two seconds of looking at it. Every other element is secondary to that first read.
The campaigns that fail at street level are almost always campaigns that tried to communicate too many things at once. A product name plus a tagline plus a social handle plus a QR code plus a website plus supporting copy is not a poster. It’s a pamphlet printed large. Decide what the poster is about and make that decision visible from 20 feet away. Everything else supports that one idea.
Color Behavior at Street Scale
Colors behave differently on paper and in outdoor light than they do on a calibrated monitor. Reds and oranges tend to pop and advance visually, which is why they’re common in high-visibility campaigns. Blues and dark greens can retreat or become muddy in certain lighting conditions. Bright yellows, particularly the electric yellow-green family our brand uses, hold exceptionally well across lighting environments.
High contrast between text and background is non-negotiable. Black text on white, white text on black, yellow text on black, black text on yellow. These combinations hold regardless of lighting condition and surface texture. Anything more nuanced than that needs to be tested in a real environment before you commit to a print run.
AGM Field Note: Before approving any creative for print, we recommend a physical proof test. Print the poster at actual size, pin it to a wall or fence, and look at it from 10 feet and 20 feet. Look at it in daylight and under artificial light. What you see in those five minutes will tell you more than any screen preview. The number of campaigns that have been rescued by this step is considerable.
Type Size and Font Choice
Title type on a 24×36 poster should be set no smaller than 120 points for the main headline. Supporting text at 60 to 80 points minimum. Body copy that requires reading from close range will not be read. People pass posters at walking pace, often without stopping. Your hierarchy needs to work at walking pace first, then reward closer inspection as a secondary layer.
Sans-serif typefaces perform more reliably at street scale than serif typefaces. Display fonts with strong stroke contrast can lose legibility when the surface is textured or when light hits at an oblique angle. The simplest font that looks intentional at street scale is almost always the better choice.
Location Selection: The Work That Happens Before Printing
Location selection in fly posting is not something you do from a spreadsheet. You walk the streets. You look at what’s on the walls. You observe foot traffic at different times of day. You identify which corridors are dense with active posting culture and which are cleaner, more likely to hold your placement without immediate competition.
Match the Neighborhood to the Audience
Every neighborhood in a city has a different demographic character, a different daily foot traffic composition, and a different set of cultural associations. The audience on Bedford Avenue in Williamsburg is not the same as the audience on Fifth Avenue in Midtown. Fairfax Avenue in Los Angeles pulls a different crowd than Venice Beach or Century City. You have to know these distinctions before you build a location plan.
More specifically: resist the pull toward the most famous streets in any given city. Famous streets are often the most competitive posting environments. They also attract broad audiences that may not match your target demographic. Hyper-specific location selection in corridors that over-index for your audience almost always outperforms spreading placements across the city’s most obvious blocks.
In Chicago, Wicker Park’s Milwaukee Avenue and Division Street pull a very different crowd than River North or the Gold Coast. In Nashville, the Gulch and 12 South serve different audiences. In Austin, South Congress is not the same as East Sixth Street. These distinctions matter. A campaign that places correctly for the demographic is working from the moment it goes up. A campaign that places on the most-photographed street in the city but misses the demographic is paying for exposure it’s not converting.
Assess the Wall Before You Commit
Beyond neighborhood selection, individual wall assessment matters more than most first-time campaign managers expect. A wall in a heavy posting zone will cycle through new placements faster than a cleaner wall in a lower-activity corridor. A poster placed on textured brick bonds differently from one placed on smooth concrete or plywood. Understanding these variables is part of what separates productive placements from wasted ones.
The factors we assess for every wall include: surface texture and condition, existing posting activity, height and sight line relative to foot traffic, proximity to destinations that generate foot traffic (bars, coffee shops, train stations, retail), and directional orientation relative to prevailing pedestrian movement. A wall that faces into approaching foot traffic outperforms one that faces away from it. These details compound across a full placement plan and significantly affect campaign results.
Scout Before Every Campaign
Markets change. What was a productive posting corridor six months ago may have become a construction site today. What was an overlooked street may have become the new center of a neighborhood’s visual culture. We scout before every campaign, regardless of how well we know the market. Never rely on locations from previous campaigns without confirming they still make sense in current conditions.
AGM Field Note: Location quality beats location quantity. We’d rather place 60 posters in precisely the right corridors for a client’s demographic than 200 posters spread across the city’s most common posting spots. The difference in campaign efficiency is significant. When we’re scoping a new market, we walk a minimum of six hours of street time before building a placement plan.
Materials: What Goes Into a Campaign That Holds
Print quality and paste quality are the two material variables that most directly affect how long a fly posting campaign stays up and how it looks while it’s up. Both are areas where cutting costs creates problems that cost more than they save.
Paper Weight and Coating
The standard range for fly posting paper is 60 to 80 lb text weight. This range bonds well with paste, is easy to apply without wrinkling, and holds color saturation well. Lighter paper (50 lb and below) tears easily during application and degrades faster in damp or windy conditions. Heavier paper (90 to 100 lb) provides more durability and better detail retention in large-format prints but requires more careful application to avoid air pockets between paper and surface.
Coating matters for color fidelity and weather resistance. Matte and semi-matte coatings are preferred for most fly posting applications. They read well across lighting conditions, absorb paste more evenly for better adhesion, and don’t create the harsh reflections that glossy finishes produce on sunny days. For campaigns expected to run longer than three weeks or in markets with unpredictable weather, a UV-resistant matte coating significantly extends the visual lifespan of the placement.
Paste Formulations
Wheatpaste is the traditional adhesive for fly posting: flour and water cooked to a thick, gel-like consistency. It’s water-soluble before drying, makes application easy, and creates strong adhesion on porous surfaces like concrete, brick, and untreated wood. After drying, wheatpaste forms a semi-permanent bond that resists light rain and wind.
Commercial methyl cellulose paste is a synthetic alternative that professional crews often prefer for its consistency. It mixes to a precise viscosity, has a longer working time before setting, and performs more predictably across surface types. On smooth, non-porous surfaces like metal or painted concrete, methyl cellulose generally provides better adhesion than traditional wheatpaste.
Hybrid formulations combining wheat starch with methyl cellulose are common in professional fly posting work. The wheat starch provides strong initial tack for quick installation, while the methyl cellulose adds durability for longer campaign windows. We adjust our paste formulation based on surface type, weather forecast for the days following installation, and campaign duration requirements.
Poster Format Reference
Format
Size
Best Surface
Best Use Case
Visibility Distance
Snipe / Handbill
11″ x 17″
Pole, fence, door
Dense saturation, event dates
5–10 feet
Standard Street Poster
24″ x 36″
Wall, barrier, fence
Music, events, product launches
10–25 feet
Large Format
48″ x 72″
Wide wall, construction barrier
Brand presence, major campaigns
25–50 feet
Supersized
60″ x 90″ or larger
Building side, long barrier
Major launches, event campaigns
40–80 feet
Tiled Mural Panel
Custom multi-panel
Full building side
Immersive brand moments
Street-wide
Execution Timing and Installation
Installation timing is one of the most consistently underestimated variables in fly posting campaign planning. When a campaign goes up matters in multiple ways: freshness at peak foot traffic times, interaction with weather conditions, and the practical reality that crew working conditions affect installation quality.
Why We Install Overnight
Professional fly posting crews install between midnight and 5 AM. The practical reasons are straightforward. Streets are significantly quieter, which allows for more careful, deliberate installation. Crew can move at a pace that prioritizes quality over speed, brushing out air bubbles, ensuring edges bond properly, and aligning multi-panel installations with precision. The result is placements that look better and hold longer.
Overnight installation also means placements are fresh when the morning foot traffic peaks. The first commute of the day after an installation is the highest-impact moment of a campaign. People notice new additions to walls they walk past every day. Freshly installed placements in excellent condition during the morning rush are as good as it gets for initial exposure.
Sequencing Across Multiple Nights
Larger campaigns or campaigns across multiple neighborhoods stage installation across two to three nights. This maintains the quality level of each individual placement without rushing. A crew forced to move too fast will sacrifice installation quality in the later placements of a long night, and that shows in the documentation photos. Staging across nights keeps quality consistent across the entire campaign footprint.
For multi-market campaigns, we coordinate installation across cities to fall within the same 48-hour window. This creates a unified campaign moment and allows for consistent reporting timelines. Coordinating crew schedules, print shipping, and market-specific timing across multiple cities requires earlier lead times on production, but the campaign coherence is worth it.
Weather Awareness
Paste does not behave the same way in 40-degree weather as it does in 75-degree weather. Cold temperatures slow setting time and can reduce adhesion on cold surfaces, particularly metal and painted concrete. Rain during or immediately after installation compromises adhesion before paste can fully cure. Hot, dry conditions accelerate drying and can cause paper to buckle if not applied quickly and smoothly.
We monitor weather forecasts for every installation window and adjust paste formulation and timing accordingly. A rain forecast 48 hours out changes how we approach an installation. A cold front moving through changes paste viscosity targets. These adjustments are not optional. They are the difference between a campaign that holds two weeks and one that starts peeling on day three.
AGM Field Note: We never install in active rain. We work around forecasts and schedule to install with at least 12 hours of dry weather expected after completion. Paste needs time to cure before it can handle precipitation. Campaigns installed in the wrong conditions lose placements within 48 hours and have to be partially or fully reinstalled, which doubles the cost and compresses the effective campaign window.
Campaign Planning: From Brief to Street
A well-executed fly posting campaign moves through a consistent sequence. Understanding each stage helps you plan timelines, allocate budget, and set realistic expectations for what the campaign will deliver.
The Brief
Every campaign starts with a brief that answers three questions: Who are you trying to reach? What do you want them to do or feel? Where are they physically located in the city? The answers to these questions drive every decision that follows. A campaign for a new sneaker release targeting streetwear-aligned 18 to 28-year-olds in New York is a completely different campaign from one for a jazz album targeting 35 to 55-year-olds in the same city. Same format, completely different geography, creative direction, and scale.
Location Scouting
After the brief, we build a location plan. For markets we know well, this draws on our existing database of productive corridors and surfaces, combined with current conditions scouting. For markets we’re entering for the first time, we do in-person scouting and deliver a location plan with photos of proposed surfaces before any print production begins. This step is non-negotiable for campaigns where placement precision matters.
Creative Review
We review creative before it goes to print. Fly posting has specific creative requirements that differ from other media formats. Text readability at walking pace from 10 to 20 feet. Color contrast under variable outdoor lighting. Image clarity at actual print scale, not screen preview scale. We check these factors and flag anything that needs adjustment before the file goes to press. This is not a gatekeeping step. It is a quality control step that exists because bad creative at street scale undermines the entire campaign.
Print Production
Standard production for a fly posting campaign takes seven to 14 days depending on quantity, format, and current vendor capacity. We work with print partners who understand outdoor-specific production requirements and who we’ve tested across many campaigns. We review physical proofs before any large quantity goes to press. Rush campaigns can compress production to five to seven days when the files are clean and vendor capacity allows.
Campaign Timeline Reference
Stage
What Happens
Typical Duration
Brief and Strategy
Objectives, audience, market selection
1–3 days
Creative Review
File review, feedback, approval
1–5 days
Location Scouting
Corridor selection, surface assessment
2–5 days
Print Production
Proofing, full run, delivery
5–14 days
Installation
Overnight crew deployment
1–3 nights
Documentation
Geo-tagged photos, placement report
2–5 days post-install
Documentation: What You Should Receive After Every Campaign
Documentation is not an optional add-on. It is a core component of a professional fly posting campaign. Without documentation, you have no way to verify what was placed, where it was placed, or what condition it was in when it went up.
Every campaign we run delivers geo-tagged placement photos taken immediately after each poster goes up. These photos show the placement in context, with surrounding environment visible, at a time when the installation is fresh and the paste is still wet. They confirm the exact location, the quality of the installation, and the visual presence of the placement in its actual environment.
Beyond individual placement photos, we deliver a campaign summary that maps every location and organizes documentation by neighborhood and market. For multi-market campaigns, each market is reported separately with its own placement documentation. This gives your team a complete picture of the campaign’s physical footprint and the material to share internally or with clients.
Using Documentation to Plan Future Campaigns
Good documentation also functions as a location database for future campaigns. When you can see exactly where placements were made, what the walls looked like, and what the surrounding environment was, you can make informed decisions about which locations to repeat, which to replace, and where to expand for the next campaign. Every well-documented campaign builds institutional knowledge that makes the next one more efficient.
Budget Allocation: Where the Money Should Go
Budget pressure in fly posting campaigns almost always lands on print production first. This is almost always the wrong place to cut. The visible quality of a poster at street scale is the primary driver of whether the campaign generates the attention and photo documentation you’re paying for. Posters that look cheap at street scale look cheap in documentation photos, in social posts by people who photograph them, and in every other context where they appear.
The areas where campaigns can realistically trim without compromising results are quantity (fewer, better-placed posters in tighter geographic focus) and timing (single-market before multi-market if budget is constrained). The areas where cutting almost always costs more than it saves are print quality, paste quality, and installation crew experience.
An experienced installation crew versus an inexperienced one is not a line item difference. It’s the difference between placements that look clean and hold for three weeks and placements that are bubbling and peeling by day five. Experienced crews move faster, waste less material, and produce documentation photos that reflect well on the campaign. Inexperienced crews produce the opposite of all of those things.
Creative Approaches That Work in the Street Environment
Beyond the foundational design principles discussed above, there are specific creative approaches that consistently perform well in fly posting environments. These come from watching thousands of placements go up and observing how people actually interact with them.
Strong Graphic Identity
Posters with a strong, recognizable graphic identity create cumulative recognition across a campaign. When someone sees your poster on three different walls during a week, they register it more deeply than if they’d seen three different designs. Visual consistency across a campaign footprint builds recall in a way that variety doesn’t. This is true for both creative elements and color palette.
Minimal Copy
The campaigns that perform best at street level almost universally use minimal copy. A name. A date. A phrase. The discipline to leave space, to trust the visual, to resist the urge to explain everything is what separates street-effective creative from creative that was designed for a media environment where people have time to read.
Intrigue Over Information
Campaigns that create a sense of mystery or intrigue perform better than campaigns that front-load all their information. A teaser campaign with a striking image, a brand mark, and a date creates anticipation and conversation before the reveal. A campaign that tells you everything upfront gives you no reason to look twice. In the street environment, where attention is scarce and competition for it is real, campaigns that create questions tend to outperform campaigns that provide answers.
Photography-First Creative
Some of the most effective fly posting creative we’ve placed has been photography-led. A single, strong image with minimal or no text, relying on the visual to carry the weight. This approach works best when the image is genuinely striking at scale and when the campaign has enough brand equity that people who care will recognize the brand mark without a headline explaining it. The image has to earn its placement.
Common Mistakes We See in Fly Posting Campaigns
After running campaigns for over a decade, we’ve seen the same mistakes repeat across clients, industries, and markets. These are the ones that cost the most in terms of campaign effectiveness.
Designing creative for social media, not for the wall. The Instagram mockup of your poster is not a proof. The poster needs to work in the physical environment, not on a 6-inch screen in a controlled preview.
Choosing locations based on name recognition rather than audience fit. Everybody wants their poster in SoHo or on Fairfax. Not everybody’s audience actually spends time there. Know your audience’s geography before you set your location plan.
Skipping the creative review. We see avoidable print quality problems, readability issues, and color failures regularly on campaigns that didn’t run through a review before going to press. The review takes a day. Reprinting takes two weeks and doubles your materials budget.
Underestimating lead time. Campaigns with compressed timelines almost always cut corners somewhere in the production chain. Those corners show up in the finished product. Plan for the full timeline. Rush jobs produce rush results.
Focusing only on quantity. More posters in the wrong places do not outperform fewer posters in the right places. Quality of placement, in terms of location alignment with audience, is more important than raw volume.
Frequently Asked Questions
What size poster works best for fly posting?
For most urban campaigns, 24×36 inches is the standard workhorse. It reads well from across a street, fits efficiently on walls and barriers, and ships cost-effectively. For high-traffic corridors where maximum presence is the goal, 48×72 is significantly more dominant. Snipe-size posters (11×17) work well for saturation campaigns in dense areas with poles and fences.
How long does a fly posted poster typically last?
In most urban environments, a properly pasted poster holds for two to four weeks under normal weather conditions. Active posting corridors where new placements go up frequently may see faster turnover. Less competitive walls can hold placements for six weeks or more. Weather is the biggest variable outside of human activity.
What paper weight should I use for fly posting?
60 to 80 lb text weight is the standard range for most fly posting campaigns. Heavier paper (90 to 100 lb) provides more durability but requires more careful paste application to avoid air pockets. For campaigns in wet climates or with extended duration targets, heavier stock with a matte coating is worth the added cost.
Should I proof my poster before the full print run?
Always. Color shifts between screen and paper can be significant, and detail that reads fine at small scale can become muddy at street size. Get a physical proof at actual print size, pin it to a wall, and look at it from 10 and 20 feet before approving the full run. This step has saved more campaigns than any other single practice we can name.
How do I choose the right neighborhoods for a fly posting campaign?
Start with your target audience and work backward to the streets where they actually spend time. Don’t default to the most famous streets in a city. Hyper-specific corridors that match your demographic are almost always more productive than broad placements on high-profile blocks.
What time of day is best for installing fly posting?
Professional crews work between midnight and 5 AM. Streets are quieter, which allows for more careful installation. Morning rush is then the first major foot traffic after a fresh installation, which is the highest-impact initial exposure window for any campaign.
How many posters do I need for a fly posting campaign?
Quantity depends on your market, goals, and budget. A focused single-neighborhood campaign in NYC or LA might run 50 to 150 placements. A citywide presence run across multiple corridors might run 500 or more. We consistently recommend quality and precision over raw volume.
Can I run fly posting across multiple cities simultaneously?
Yes. We coordinate simultaneous campaigns across markets with staging, consistent installation windows, and unified reporting so everything hits within the same 48-hour window. Multi-market coordination requires earlier lead times on print production and crew scheduling.
What documentation do I receive after a fly posting campaign?
Every campaign we run delivers geo-tagged placement photos from every location, confirmation of placement addresses, and a campaign summary report. This gives you a complete record of the campaign’s physical footprint across every market.
How much lead time does a fly posting campaign need?
For a standard campaign, plan for two to three weeks from creative approval to installation. Rush campaigns can compress to 10 to 14 days when print production and scheduling allow. Multi-market campaigns with coordinated timing need three to four weeks minimum.