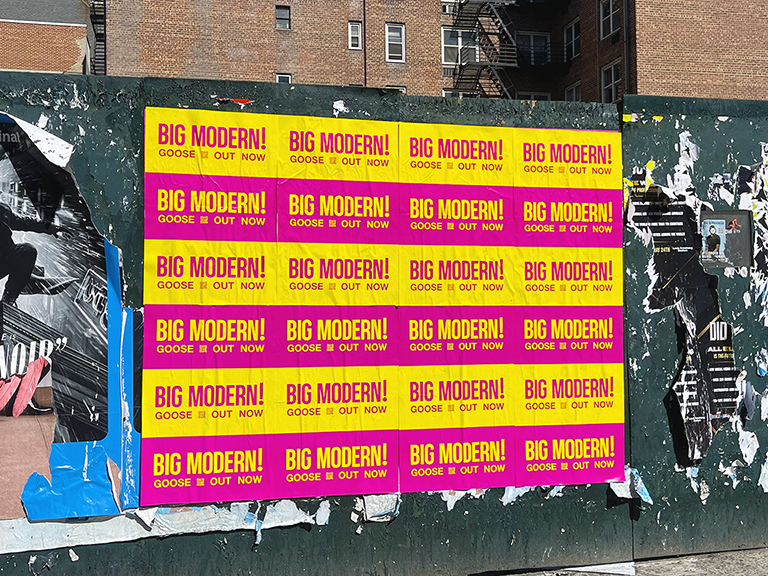
How to Do Wheat Pasting: The Complete Guide to Wheatpaste Poster Campaigns
Wheat pasting is a precise craft. The paste formula, the surface selection, the installation sequence, and the creative format all determine whether a poster lasts three weeks or falls apart overnight. Here is how it actually works.
We install thousands of wheat paste posters every year across New York, Los Angeles, Chicago, Miami, and other major cities. We have seen every possible combination of paste formula, paper stock, surface type, and weather condition affect the outcome. What we know from that experience is that wheat pasting is a craft. Do it correctly and a poster can hold on a brick wall through two weeks of summer rain. Do it carelessly and the poster is on the ground by morning.
This guide covers the full wheat pasting process from paste formula through final installation, with the material and technique specifics that determine whether a campaign produces durable, well-positioned installations that do their job for the full intended campaign duration.
Traditional wheat paste is exactly what the name suggests: a paste made from wheat flour and water. The basic formula has not changed in centuries. Street artists, political poster installers, and advertising teams have used variations of the same flour-water mixture to bond paper to surfaces since the nineteenth century.
The basic recipe is simple. Bring two cups of water to a boil. Whisk one cup of all-purpose flour into the boiling water gradually, breaking up any lumps as you go. Reduce heat and continue stirring for three to five minutes until the paste reaches the consistency of thick glue. Allow to cool before use. The result is a functional wheat paste that will bond paper to most masonry surfaces and hold for two to four weeks under normal weather conditions.
There are several common additions that improve on the basic formula. A tablespoon of white PVA glue (standard school glue) added to the cooled paste increases adhesion strength significantly, particularly on smoother surfaces. A small amount of sodium benzoate or another preservative extends the paste shelf life for multi-day campaigns where the paste needs to stay usable. For large-scale commercial campaigns, methylcellulose, the same base used in commercial wallpaper paste, is often the most reliable substitute because it offers consistent performance across a wider range of temperatures and humidity conditions than cooked flour paste.
Paste Formula Comparison
Formula
Adhesion Strength
Shelf Life
Weather Resistance
Best For
Basic Flour and Water
Good
3 to 5 days refrigerated
Moderate
Single-night campaigns
Flour + PVA Glue
Very Good
5 to 7 days refrigerated
Good
Multi-surface campaigns
Methylcellulose (commercial)
Excellent
2 to 4 weeks sealed
Very Good
Multi-day, multi-city programs
Wallpaper Paste (pre-mixed)
Excellent
Ready to use, variable
Very Good
Large-format installations
Surface Selection: What Holds and What Does Not
The surface is the most important variable in wheat paste installation longevity. Not all surfaces bond well with wheat paste. Understanding the surface characteristics before installation determines how long the poster will last and whether the installation is worth doing at a given location.
Brick
Brick is the best surface for wheat paste poster installation. The porous, textured surface allows the paste to penetrate into the gaps and irregularities of the brick face, creating mechanical adhesion that supplements the chemical bond of the paste. A properly installed wheat paste poster on old brick in a sheltered location can last six to twelve weeks. Red brick and brown brick on commercial buildings throughout SoHo in New York, Wicker Park in Chicago, and Melrose in Los Angeles are consistently among the strongest surfaces we work with.
Concrete and Masonry
Poured concrete and concrete masonry unit (CMU) block surfaces perform similarly to brick for wheat paste applications. The surface texture provides mechanical adhesion and the porosity allows paste to penetrate. The smoother the concrete finish, the shorter the installation life. Rough-cast concrete and unpainted CMU block hold well. Smooth form-poured concrete and finished concrete hold less well but are still workable surfaces.
Board_and_Plywood”>Construction Board and Plywood
Construction board, the plywood sheathing used on construction site fencing and sidewalk scaffolding, is an excellent wheat paste surface for temporary campaigns. The wood grain provides texture for adhesion, and the surface is typically flat and vertical, ideal for large-format poster applications. The limitation of construction board is its temporary nature: a building under construction that provides wall space today may be covered in cladding or removed entirely in a few weeks.
Painted Surfaces
Painted surfaces are significantly harder for wheat paste to bond to than bare masonry. The paint layer sits between the paste and the underlying porous surface, reducing penetration and mechanical adhesion. Painted brick is manageable but produces shorter-lasting installations. Painted wood or metal are poor wheat paste surfaces. We avoid installing on painted metal surfaces entirely because the adhesion is rarely sufficient to survive more than a few days.
Surfaces to Avoid
Glass, smooth metal, and polished stone surfaces do not bond well with wheat paste under any formula. Installations on these surfaces peel within hours in most conditions. We never recommend these surfaces for wheat paste campaigns regardless of the visibility or foot traffic at the location. A poster that falls off the wall by morning is a waste of production and installation cost.
Surface test before installation: We test unfamiliar surfaces before committing to a full installation. Apply a small amount of paste to a corner of the surface, let it cure for 15 minutes, and then check whether the paste is gripping or sliding. Surfaces where paste slides or pools without gripping the substrate are not worth installing on regardless of location quality.
Paper and Print Specifications for Wheat Paste Posters
Paper selection is the second most important variable in wheat paste poster longevity after surface selection. The paper has to be heavy enough to survive the installation process without tearing when wet, but light enough to conform to the texture of the surface and bond evenly with the paste.
Standard Matte Text Stock
80 lb to 100 lb matte text stock is the standard print specification for wheat paste posters. This weight is strong enough to handle wet paste without tearing during installation, light enough to conform to brick and concrete texture, and produces good image reproduction for poster graphics. This is the specification we use for most standard campaign posters in the 24×36 to 48×72 inch size range.
Weatherproof Synthetic Stock
For campaigns in weather-exposed locations or for campaigns in climates with significant precipitation during the campaign window, weatherproof synthetic poster stock is the right choice. This material is essentially waterproof, does not absorb moisture, and will not tear during installation even in humid conditions. The adhesion characteristics with wheat paste are slightly different from paper, requiring a slightly thicker paste application to achieve comparable bond strength, but the longevity benefit in wet conditions justifies the difference.
Newsprint
Newsprint is the cheapest material for wheat paste poster production. It tears easily when wet, does not last well in weather, and produces inferior image quality. We do not use newsprint for professional campaigns. It is appropriate for extremely short-run, budget-constrained situations where the installation is expected to last 48 to 72 hours only.
Step-by-Step Wheat Pasting Installation Process
The installation process is consistent across surface types and poster sizes, with minor adjustments for scale and weather conditions. Here is the process we follow for every installation.
Step 1: Surface Inspection
Before applying any paste, inspect the target surface for structural integrity, loose material, and existing installations. A surface with loose paint, crumbling mortar, or existing peeling posters needs preparation before a new installation. Brush off loose material with a stiff brush. Remove or trim any existing loose poster material that would prevent the new poster from lying flat. The new installation is only as good as the surface it is bonded to.
Step 2: Wet the Surface
For very porous surfaces like old brick, wetting the surface lightly before applying paste improves initial bond by preventing the dry surface from immediately absorbing the paste before it can spread. Use a spray bottle or a damp brush to wet the surface area where the poster will go. Do not saturate, just dampen.
Step 3: Apply the Base Coat of Paste
Apply a generous coat of paste to the surface in the shape and size of the poster you are installing. Work quickly and cover the full surface area. The base coat should be thick enough to remain wet until the poster is pressed against it, typically 1/8 inch or more. Use a wide paste brush or a paint roller for speed and coverage on large formats.
Step 4: Apply the Poster
Press the poster against the pasted surface from the top down. Align the top edge first, then press downward, smoothing with your hand or a roller brush as you go to prevent air pockets. Work from the center outward to push any trapped air to the edges. Press firmly at the edges and corners to ensure full contact with the surface.
Step 5: Apply the Top Coat of Paste
Apply a second coat of paste over the top of the installed poster, working from the center outward. This is the most important step for longevity. The top coat of paste seals the paper surface, bridges any small bubbles or gaps, and creates a protective layer that significantly extends how long the installation stays on the wall. Do not skip the top coat. Installations without a top coat fail much faster than those with one.
Step 6: Smooth and Check
Do a final smooth-over with a squeegee or roller brush to press out any remaining bubbles and ensure even paste coverage across the entire poster surface. Check the edges and corners specifically, as these are the most common failure points. Press firmly at any edge that is not fully bonded to the surface.
Installation timing: The best weather conditions for wheat paste installation are 50 to 75 degrees Fahrenheit with humidity below 60%. Rain during or immediately after installation is the worst condition because water dilutes the paste before it can cure. We always check weather forecasts before scheduling overnight installations and postpone when rain is expected in the six-hour window after installation.
Large-Format Wheat Paste Installation
Large-format wheat paste posters, those larger than 36×48 inches, require a different approach from single-sheet installations. The paste must cover more surface area, the poster is heavy when wet and prone to tearing if handled poorly, and the alignment is more difficult to control on a large surface.
For multi-sheet large-format installations, we work in strips. Apply paste to the first horizontal or vertical strip of the surface, install the first sheet, then paste the adjacent strip and install the second sheet with a 1 to 2 inch overlap on the first. Continue across the full installation area. The overlapping panels create a continuous image across the full installation surface that reads as a single piece from viewing distance.
Two-person crews are standard for large-format installation. One person applies paste and manages the poster positioning while the other smooths and presses from behind. Single-person large-format installation is possible but significantly slower and more prone to alignment errors and tears.
Common Mistakes in Wheat Pasting and How to Avoid Them
The most common failure mode in wheat paste installation is insufficient paste coverage on the base coat. Applying too thin a base coat means portions of the poster do not have adequate paste to bond before the paper is pressed in. The result is bubbling and edge separation that appears within 24 hours of installation. The fix is straightforward: apply paste generously and evenly across the full installation area before placing the poster.
The second most common failure is skipping the top coat. Installers who are working quickly sometimes apply the poster to the base coat, smooth it, and move to the next location without applying the top coat. Installations without a top coat fail significantly faster than those with one. The top coat is not optional. It seals the paper surface, bonds the edges, and adds an additional adhesion layer that is particularly important for long-duration campaigns.
A third common issue is installing on surfaces that have existing loose material: peeling paint, crumbling mortar, or the remnants of previous poster installations that have not fully bonded. When a new poster is installed over an unstable substrate, the new paste bonds to the unstable material rather than to the wall, and the whole installation peels away with the underlying loose material within a few days. Surface preparation is not a step to skip.
Professional Wheat Paste Campaign Planning
Running a wheat paste campaign for a brand at scale requires more than installation technique. It requires location strategy, creative review, production coordination, crew management, and documentation. Here is how we approach each of those elements at AGM.
Location scouting identifies the specific surfaces that will carry the campaign. We look for surfaces in the target neighborhood that have the right dimensions for the poster format, the right demographic exposure, and the right physical characteristics for wheat paste bond longevity. We photograph and GPS-stamp every location before installation so clients see exactly where their campaign will run.
Creative review checks that the poster design is appropriate for the format before production. We flag designs that are too complex for street-level legibility, that use colors likely to disappear against common surface backgrounds, or that have text that will not read at the expected viewing distance. Better to fix it before production than after 500 posters are printed.
Production coordination covers print specifications, quantity, delivery timing, and packaging for field transport. Posters need to arrive at the installation site flat or properly rolled without creasing, on schedule, and in the correct format and paper weight for the planned surfaces.
Documentation follows every installation. We photograph every completed installation in daylight with GPS timestamps and deliver a full photo report to the client within 24 hours of each installation night. Every poster, every surface, every location is documented before the campaign reporting is complete.
Frequently Asked Questions
What is the wheat paste formula?
The basic wheat paste formula is one part flour to two parts water, cooked to a thick, smooth consistency. Bring the water to a boil, whisk in the flour gradually to prevent lumps, and cook for three to five minutes until the paste thickens to the consistency of thick glue. Some practitioners add a small amount of white glue or methylcellulose for added adhesion. Commercial wallpaper paste is an effective substitute that offers more consistent results across different weather conditions.
What surfaces work best for wheat pasting?
Brick, concrete, and rough-textured masonry surfaces bond best with wheat paste because the textured surface provides mechanical grip for the paste. Construction board barriers and plywood surfaces also work well. Smooth painted surfaces, glass, and metal bond poorly with wheat paste and produce shorter-lasting installations.
What paper weight should I use for wheat paste posters?
A paper weight of 80 lb to 100 lb matte text stock is the standard for wheat paste poster production. Lighter paper tears more easily during installation when wet. Heavier paper is harder to work with on curved or uneven surfaces. For outdoor campaigns with expected weather exposure, weatherproof synthetic poster stock provides the best combination of durability and workability.
How long does wheat paste take to dry?
Wheat paste typically reaches initial set in 30 to 60 minutes under normal conditions. Full cure, where the paste has reached maximum bond strength, takes 2 to 8 hours depending on temperature and humidity. Installations in humid or cold weather cure more slowly. The paste is most vulnerable to water damage in the first few hours after application.
How long do wheat paste posters last?
Well-installed wheat paste posters on brick or concrete in normal weather conditions last three to eight weeks. Hot dry summers can extend this. Cold wet winters shorten it. Exposed surfaces facing direct rain last shorter. Protected surfaces under awnings, overhangs, or roof eaves last significantly longer.
What tools do you need for wheat pasting?
The basic toolkit for wheat pasting includes: a large-bristle paintbrush or paste brush for surface application, a roller brush for smoothing the poster after application, a bucket for carrying and mixing paste, pre-mixed paste in a portable container, rolled posters in a protective tube or flat in a portfolio, and a headlamp if working at night. Commercial paste rollers and squeegees speed up the installation process for large-format work.
What is the step-by-step process for installing a wheat paste poster?
Apply a layer of paste to the surface in the shape of the poster. Press the poster against the pasted surface from top to bottom, smoothing as you go to prevent bubbles. Apply a second layer of paste over the top of the poster, working from the center outward. Smooth the edges firmly to ensure full contact with the surface. Allow to cure undisturbed. The top coat of paste seals the poster and extends its lifespan significantly.
Can AGM handle wheat pasting campaigns professionally?
Yes. We plan, produce, and install professional wheat paste poster campaigns in New York City, Los Angeles, Chicago, Miami, Austin, and other major US markets. Our team handles location scouting, creative review, print production coordination, installation, GPS documentation, and post-campaign reporting.
Can wheat pasting be done on curved surfaces?
Yes, with adjustments to technique. Curved surfaces, like columns, utility poles, and rounded building corners, require more careful paste application and poster smoothing to prevent bubbling on the curved face. For cylindrical surfaces, posters need to be sized to wrap the curve without buckling, which means selecting a format width that is less than or equal to half the circumference of the cylinder. On concave curves, poster adhesion is generally easier than on convex curves because the paper is pulled toward the surface rather than away from it.
What happens to wheat paste installations in extreme heat?
High heat accelerates paste drying, which can be beneficial for cure time but can also cause the paste to dry unevenly, leading to bubbling or edge separation if the top coat was not applied consistently. In very hot conditions, above 90 degrees Fahrenheit, we apply paste more quickly and in slightly thicker layers to compensate for faster evaporation. Summer installations in hot markets like Miami, Austin, and Los Angeles are planned for overnight hours when temperatures are lower, both for crew comfort and for better paste performance during the critical curing window.