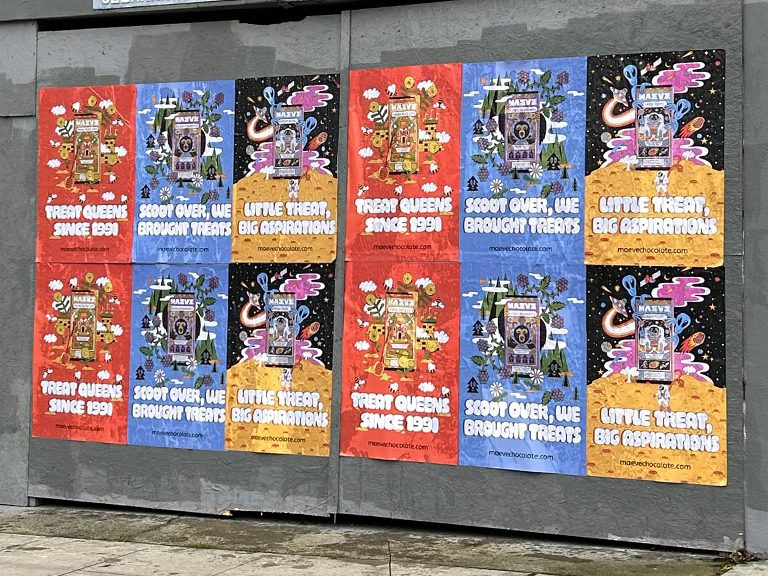
This is the wheat paste how-to that covers everything from mixing the first batch to executing a multi-neighborhood campaign with professional documentation.
Getting wheat paste right requires understanding three separate things: the paste itself, the paper it bonds, and the surfaces it bonds to. Get all three right and your posters go up clean, lie flat, and stay on the wall. Miss any one of them and the campaign starts peeling in the first rain.
At American Guerrilla Marketing, we have mixed paste in the morning and been on the street before six. We have pasted in Crown Heights in July and on Wicker Park construction barriers in October. We have run campaigns for 25 placements and for 400. The material knowledge behind all of that work is what this guide covers. Read it front to back before you start.
Wheat paste is an adhesive made by cooking wheat starch or flour with water. The heat ruptures starch granules and releases polymer chains into the water, forming a viscous gel with strong adhesive properties. The paste penetrates porous surfaces like brick, concrete, and paper, forming a mechanical bond as it dries. Add PVA (polyvinyl acetate) glue and the dried film gains significant water resistance, which is essential for outdoor applications.
The adhesive chemistry means wheat paste bonds most effectively to porous surfaces where it can penetrate and interlock mechanically. Smooth, sealed, or coated surfaces do not give the paste enough purchase points, which is why smooth glass and polished metal are poor surfaces for paste-up and why glossy coated paper fails as a poster substrate: the coating prevents paste from penetrating the paper fiber, and the bond stays at the surface level rather than going through it.
Wheat Paste Recipe: Three Versions for Different Applications
The recipe that works depends on the application: small test, standard outdoor campaign, or professional outdoor with maximum weather resistance.
Version 1: Small Batch Test Recipe (15 to 30 posters)
1 cup all-purpose flour or wheat starch
4 cups cold water
Optional: 2 tablespoons white glue for improved durability
Dissolve flour or starch in 1 cup cold water. Stir until smooth. Bring remaining 3 cups of water to medium heat, add the dissolved mix while stirring. Cook 10 to 15 minutes until thick and slightly translucent. Cool before using. Add white glue after cooling and stir thoroughly.
Version 2: Standard Outdoor Campaign Recipe (50 to 150 posters)
3 cups wheat starch
10 cups cold water for cooking
Additional water to reach working consistency after cooling
1/2 cup PVA glue added to cooled paste
Same cooking method scaled up. After cooling, add PVA and mix thoroughly. Working consistency should coat a wide brush and pull off in slow drips, not run freely. Thin with water if needed.
Version 3: Professional Campaign Formula (150 to 500+ posters)
6 cups wheat starch
1.5 gallons cold water for cooking
Hot water added after cooking to reach working consistency
1 to 1.5 cups PVA glue
Optional: 2 tablespoons glycerin for cold-weather workability
Cook in large batches in multiple pots if needed. Combine into a clean 5-gallon bucket. Add PVA after cooling. Adjust consistency with water. This batch produces enough paste for a full installation day in a major city with two-person crew working standard 24×36 format.
AGM Field Note: Starch vs. Flour at Scale
At small scale, all-purpose flour is fine. At campaign scale, wheat starch produces a cleaner bond and a slightly clearer dried film. The difference in adhesion quality matters more when you are doing 200 placements and need every single one to hold through varying surface conditions. We switched to starch-PVA formula as our professional standard years ago and have not gone back.
Weather Adjustments for Paste Formula
Weather is the variable most DIY campaigns underestimate. Professional operations adjust paste formula based on conditions.
Condition
Effect on Paste
Adjustment
Hot (85F+), direct sun
Paste dries too fast, reduces working time
Thicker paste, add PVA, install early AM or evening
Warm (65-85F), overcast
Ideal conditions, normal working time
Standard formula, no adjustment needed
Cool (45-65F)
Slightly longer working time, slower cure
Slightly thinner paste to maintain brush-ability
Cold (28-45F)
Paste thickens faster, slow cure
Thinner paste, add glycerin, schedule for midday
Rain or wet surfaces
Paste cannot bond properly
Do not install. Reschedule for dry window.
High humidity (80%+)
Extended cure time, some edge moisture retention
Heavier edge sealing, plan for longer cure window
Paper Selection: The Single Variable That Kills Most DIY Campaigns
The wrong paper makes a campaign fail even with perfect paste and perfect application. Here is what you need to know.
Use: Uncoated text or cover stock, 60 to 80 pound weight. This is the standard. It absorbs paste well, prints with accurate color, handles installation without tearing at normal working conditions, and survives outdoor weather for weeks.
Do not use: Glossy coated stock of any kind. The coating on glossy paper prevents paste penetration. The adhesive sits on the surface of the paper rather than going through it, which means the bond is surface-level and fails quickly. Do not let a print shop talk you into glossy because it looks better. It looks worse after 48 hours on a wall.
Do not use: Standard copy paper or lightweight bond paper. At 20 to 24 pounds, this paper tears during installation when wet with paste, especially on rough surfaces. It also has almost no weather resistance.
Consider for premium campaigns: 80 to 100 pound uncoated poster stock or satin stock for campaigns where visual quality and durability matter more than cost efficiency. Printable synthetic substrates (polypropylene-based) for campaigns in wet climates or long-duration placements.
Surface Assessment: What to Look For Before You Paste
Every professional installation starts with a surface check. The same poster, the same paste, and the same technique produces wildly different results on different surfaces. Here is the check list.
Good Surfaces
Sealed or painted plywood: construction barriers, boarding. This is the most consistent surface in urban environments. Takes paste well with minimal prep.
Painted brick or concrete block with a stable paint layer. Press a fingernail into the paint surface: if it does not flake or chip, the layer is stable enough to paste over.
Unpainted rough concrete with moderate porosity. Pre-wet thoroughly before pasting.
Existing stable poster layers. The accumulated paper creates a surface that accepts new paste very well.
Any surface with loose or flaking paint. The paste bond is only as strong as the weakest layer. If the paint underneath is failing, your poster fails with it.
Glass or polished metal: no mechanical bond points.
Active moisture or wet surfaces from recent rain: paste cannot cure in waterlogged conditions.
Fresh paint less than 48 hours old: new paint off-gases and the surface chemistry changes as it cures. Paste applied over fresh paint often fails within days.
Silicone-coated or water-repellent surfaces: the coating blocks paste adhesion.
Tools You Need for Professional Paste Installation
5-gallon bucket with lid: Transport and working reservoir. Lid keeps paste from skinning over during transit.
4-inch foam roller or wide brush: For applying paste to wall surfaces and poster faces. Foam rollers cover ground faster. Brushes give more control on irregular surfaces.
2-inch trim brush: For corners, edges, and tight spots. This tool is what determines whether posters peel at the edges.
Water bucket or spray bottle: For surface pre-wetting before paste application.
Foam roller sleeve: For pressing bubbles out of large-format placements more efficiently than a hand.
Step ladder or fold-out stool: For placements above standing height.
Nitrile gloves: Paste stains hands and is difficult to remove from clothing.
Camera or smartphone: For documenting every placement immediately after installation.
Headlamp: For early morning or evening installs.
Two-person crews are significantly more effective than solo operators for any campaign over 25 placements. One person handles paste application; the other handles positioning, pressing, and edge sealing. Split the work and you cover more ground in less time with better quality at every placement.
Installation: The Full Step-by-Step Sequence
The installation sequence below applies to every placement in every campaign we run. The sequence is non-negotiable. Each step builds on the one before it.
Step 1: Surface check. Is the surface stable? Dry? Appropriate for paste? If any answer is no, move to the next location. Do not try to force a bad surface to work.
Step 2: Pre-wet the surface. Spray or sponge clean water onto the wall in the target area. On porous surfaces like brick or rough concrete, this is essential. On plywood and painted metal, it helps. Never skip this on brick or concrete.
Step 3: Base coat. Apply a generous coat of paste to the wall surface, covering an area slightly larger than the poster on all sides. The base coat needs to stay wet while you position the poster. Work quickly but apply enough paste that you are not racing against drying time.
Step 4: Position the poster. Align carefully before pressing down. Use a partner whenever possible. Once paste-coated paper contacts a paste-coated surface, you cannot reposition without tearing. Take ten extra seconds to get alignment right.
Step 5: Center press outward. With the poster against the wall, press from center to top edge, center to bottom edge, center to left, center to right. Push trapped air out systematically. On large formats, use a foam roller for even pressure. Make sure no air pockets remain before the paste starts setting.
Step 6: Top coat. Apply a full coat of paste over the entire face of the posted paper. Cover every square inch. The top coat saturates the paper from the front and creates the continuous adhesive matrix that makes paste-up work the way it is supposed to. Do not rush this step and do not miss any area.
Step 7: Edge and corner sealing. Take the 2-inch trim brush and work paste under every edge and into every corner with deliberate pressure. This step determines whether the poster is still on the wall in 10 days or peeling in four. Spend 30 extra seconds per placement on edge sealing. It is worth it every time.
Step 8: Photograph. Take one context photo from across the street and one close photo before moving to the next location. Every placement. No exceptions. These photos are your campaign documentation.
AGM Field Note: The Two-Coat System Is Not Optional
The base coat plus top coat is what makes wheat paste installation work. We see the results of skipping the top coat regularly: campaigns where someone pasted the back of the poster and stuck it to the wall like a sticker. Within days those posters are lifting from the surface, starting at corners, then edges, then bubbling across the face. The top coat saturates the paper and creates a bond that the base coat alone cannot achieve. Run the full sequence every time.
Campaign Planning: From Brief to Installation Map
Single-placement paste jobs do not require planning. Campaign-scale work does. Here is the planning framework we use.
Audience First, Geography Second
Start with a clear picture of who you are trying to reach. Demographic characteristics, lifestyle markers, neighborhood patterns, and media consumption habits. Then map the neighborhoods where that person concentrates. For a music label targeting 18-to-25 year olds interested in hip-hop and R&B, the New York answer includes Crown Heights, Flatbush, the South Bronx, and Harlem. For a streetwear brand targeting the same age range but fashion-forward, the answer shifts toward Bushwick, Williamsburg, and the Lower East Side.
Geography should follow audience, not convenience or cost.
Zone Planning: Density Over Coverage
Define campaign zones rather than scattering placements across a wide area. A zone is a tight geographic cluster where the campaign achieves visible saturation. Three to five placements on consecutive blocks in one zone creates a feeling of presence. Three to five placements spread across an entire borough creates nothing. A 100-placement campaign concentrated in five zones of 20 placements each outperforms the same 100 placements spread across 50 blocks.
Format Selection for the Surface Inventory
Scout the surface inventory in your target zones before finalizing format. Not every neighborhood has the same surface types. Some are primarily plywood construction barriers (good for any format). Some are primarily painted brick (works well with 18×24 and 24×36). Some have limited available surface inventory that constrains format options. Know what you are working with before you print.
Timeline and Installation Windows
Plan installation windows around weather forecasts. Check the forecast for the 48 hours following the planned install date. Identify the dry windows. Schedule morning installs in summer, midday installs in winter. Build a one-day weather buffer into the campaign timeline so a rain day does not derail the schedule.
Measuring Campaign Performance
Wheat paste campaigns produce measurable results across multiple channels when you set up tracking before the campaign launches.
QR codes: Every poster design should include a campaign-specific QR code. Scan volume is direct engagement data. A unique landing page URL behind the code lets you track downstream behavior: site visits, sign-ups, purchases, app downloads.
Branded search monitoring: Pull your branded search volume from Google Search Console before the campaign launches. Compare to the same data during and after the campaign period. Street campaigns consistently produce measurable search lift in the target geography within three to seven days of installation.
Direct traffic analysis: Monitor direct traffic in your web analytics during and after the campaign. Brands whose poster includes a memorable URL or whose name is distinctive see direct navigation spikes that correlate with install dates.
Campaign reports with placement photos: Our documentation is the baseline. Every placement photographed, every location recorded. These photos serve as accountability documentation and as content for brand social channels and PR.
AGM Field Note: Route Planning Saves More Campaigns Than Better Art
Teams spend hours debating layouts and almost no time thinking about installation flow. A smart route puts the crew in the right neighborhoods at the right time of day, minimizes hauling wet paste between blocks, and sequences easy surfaces before the trickier ones. That operational discipline protects the posters, the crew’s energy, and the final quality of the install.
Advanced Installation Tactics for Different Surface Types
Once you know the base sequence, the next level is understanding how different surfaces change your pressure, paste load, and timing. The technique on painted plywood should not be identical to the technique on rough masonry. Skilled crews adjust without overthinking it because each wall tells you quickly how absorbent and forgiving it is.
Plywood and Construction Barriers
Plywood is the easiest high-volume surface because it is flat, moderately porous, and predictable across long runs. Use a medium base coat, place the poster quickly, then top-coat evenly. Because seams between boards can telegraph through the paper, press extra firmly at board joints. If the barrier has splinters or lifted grain, sand or skip the worst sections rather than forcing the poster onto a rough patch that will tear during pressing.
Brick, Block, and Rough Concrete
Rough masonry drinks water fast. Pre-wet more heavily than you think you need, then apply a thicker base coat so the wall does not steal all your moisture before the sheet is positioned. Smaller formats usually outperform oversized sheets on rough walls because they conform more easily to surface texture. On especially coarse concrete, use a roller or cloth to push the paper into the surface profile before the top coat sets.
Painted Metal and Utility Surfaces
Metal surfaces do not absorb paste, so the bond happens primarily at the paper layer and any slight surface tooth in the paint. That means clean application matters even more. Keep the base coat thinner, avoid overloading the wall, and spend extra time on edges because sliding is more likely during placement. On hot days, metal heats up fast and shortens working time, so install these surfaces early when possible.
Artwork Prep Before the Print Run
Poster failure often starts at the file stage. If the artwork is not built for outdoor reading distance, no amount of installation skill can save it. We tell clients to think about the first half second of attention, then the next two seconds. The first half second determines whether someone registers the poster at all. The next two seconds determine whether they read, photograph, or remember it.
That means testing at full size before approving the run. Print one sheet, tape it to a wall, and step back 10, 20, and 30 feet. Check headline legibility, face visibility, logo clarity, and QR scan behavior. Fine details that look cinematic on a monitor often disappear entirely on a real street surface.
Artwork Element
Street-Ready Standard
Common Failure
Headline size
Readable from 15 to 25 feet
Too small for moving foot traffic
Contrast
Strong figure-ground separation
Muted palette disappears in daylight
Logo treatment
Simple and high contrast
Thin lines break up on textured walls
QR code
Tested from standing distance
Too small or placed over busy texture
Managing Multi-Day Campaigns
A one-day route is mostly about pace. A three-day or five-day route is about consistency. Paste viscosity changes overnight. Weather shifts. Crew fatigue shows up in edge sealing and photo quality. To keep a multi-day campaign clean, you need repeatable routines.
We standardize morning prep, bucket counts, route packets, and documentation cadence before day one starts. Each day begins with checking paste consistency, confirming stock counts by neighborhood, reviewing route order, and flagging any surfaces rejected during scouting. Each day ends with photo backup, leftover poster count, and notes about which blocks were more competitive or more productive than expected.
That operating rhythm matters because it turns a street campaign into a controlled production instead of a scramble. The more placements involved, the more important that discipline becomes.
Frequently Asked Questions
What is the most common wheat paste mistake?
Skipping the top coat. By a wide margin. Applying paste to the wall, pressing the poster, and calling it done produces a campaign that starts peeling within days. The top coat, applied over the entire face of the posted paper, is what creates a durable, through-saturated bond. No top coat means no real adhesion. Run the full two-coat system on every placement.
What is the right consistency for working wheat paste?
Working paste should coat a 4-inch brush fully and pull off in slow, thick drips. It should not run freely off a brush when held horizontally. It should not be so thick that it clumps or resists spreading. Somewhere between a thin cream sauce and a thick batter is the target zone. Adjust with water to reach that consistency if the paste came off the stove thicker or thinner than desired.
How long before you can disturb a freshly pasted poster?
Give freshly pasted placements at least 30 to 45 minutes before any handling or adjustment. The paste needs time to begin setting before external interference. Full working cure takes two to four hours under normal conditions. If rain is expected, the placement is at risk until the paste has been curing for at least six to eight hours. Schedule installs in dry weather windows of at least 12 hours after placement whenever possible.
How many posters can a two-person crew install in one day?
A professional two-person crew with a well-planned route can install 60 to 90 standard 24×36 posters in a full working day in a dense urban environment like New York City. Larger formats or widely spaced locations reduce that number. A poorly planned route can cut daily output by 30 to 40 percent from the same crew. Route planning before the installation day makes a material difference in campaign efficiency.
Can you paste over existing poster layers?
Yes, and often the result is better adhesion than on a bare wall. Accumulated paper layers from previous campaigns create a thick, stable surface that accepts new paste very well. The only caveat is that the existing layers need to be adhered and stable, not actively peeling. If the existing layers are lifting, paste applied over them will lift along with them. Check the stability of existing layers before deciding whether to paste over them or clean the surface down to bare wall.
What is the difference between PVA paste and regular wheat paste?
Regular wheat paste is made from starch or flour and water only. PVA paste adds polyvinyl acetate glue to the cooled starch paste. The addition of PVA changes the dried film chemistry significantly: the PVA component forms a flexible, water-resistant film that dramatically improves weather resistance compared to starch-only paste. For outdoor campaigns in any weather condition, PVA-enhanced paste is the professional standard. For small indoor applications or temporary use, starch-only paste is adequate.
What is the best poster format for a wheat paste campaign?
24×36 inches is the most common professional format for commercial wheat paste campaigns. It is large enough to command attention from across the street, small enough for a two-person crew to install efficiently on a wide range of surfaces, and a standard size for most large-format print vendors. 18×24 is a good option for campaigns prioritizing cost efficiency and installation speed over visual scale. Larger multi-panel formats provide greater visual impact for feature placements but require more installation time per location.
How do you prevent edges from peeling on a paste-up poster?
Three things prevent edge peeling: a generous base coat that extends past the poster edges, a thorough top coat that covers all four edges completely, and deliberate edge sealing with a small trim brush immediately after the top coat. Edges need more paste than the center, not less, because they are the first to lose moisture during curing and the first to experience mechanical stress from wind and vibration. Address every edge and every corner deliberately on every installation.
How does American Guerrilla Marketing plan location routes for campaigns?
We scout target neighborhoods on foot before every campaign, walking each target zone and identifying viable surfaces, high-traffic locations, and audience-appropriate wall inventory. The scout output is an installation route map that sequences stops logically to minimize backtracking and maximize daily placement output. Route planning is done before install day, not on it. The difference in daily output between a well-planned route and an improvised one is typically 20 to 40 percent more placements from the same crew and time.
Every placement gets photographed on installation day, before the crew moves to the next location. Photos show the placement in context and close up. We organize these into campaign reports delivered within days of installation completion. Larger campaigns include geo-tagged placement maps showing the full campaign geography. Campaign documentation serves as both accountability and content: clients regularly use placement photos across their own social channels and marketing materials.